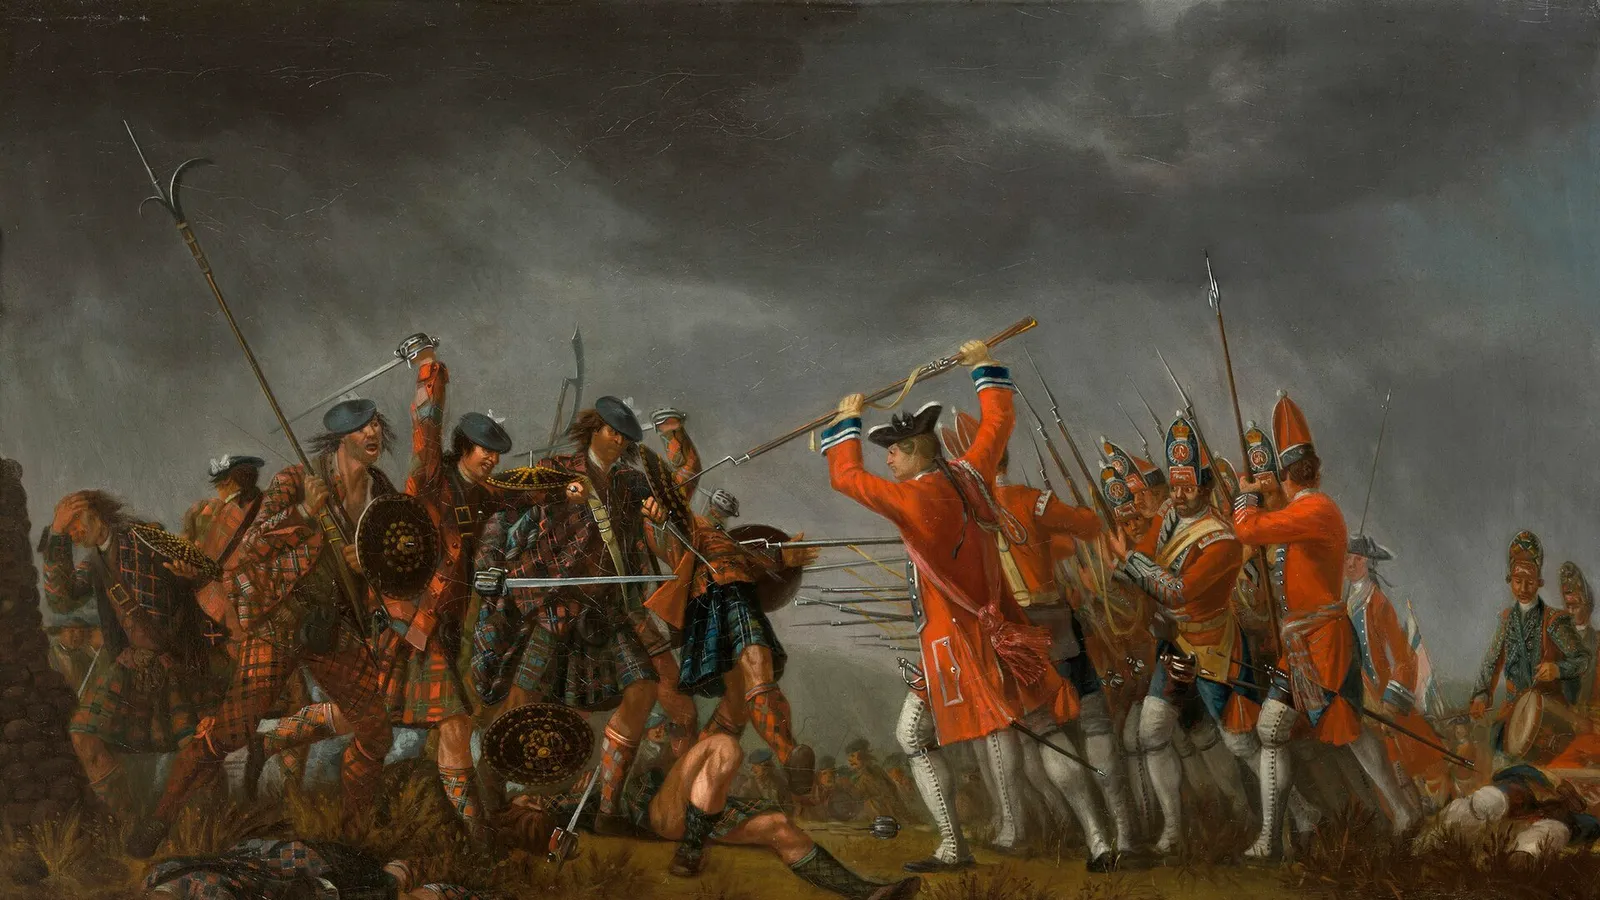

The Highland Charge — Defence Series Card #28
TL;DR
- The Highland Charge was a genuine, documented battlefield shock tactic used by Scottish Highland and clan forces from the 1640s to the 1740s (and, in British Army service, as late as 1759 and 1776); this is a thematic/tactical card examining the tactic across its full arc, distinct from the battle-specific and regiment-specific cards elsewhere in this series. established
- Its documented mechanics were a disciplined sequence, not a wild rush: advance in loose clusters, endure incoming fire, fire a single close-range volley, drop firearms, then close at a run with broadsword, targe and dirk for a shock melee. established
- It exploited specific vulnerabilities of 17th–18th-century linear infantry: the roughly 20–30 second musket reload, the plug bayonet (which blocked the muzzle when fixed), and the psychological shock of a rapid close-quarters assault. established
- It won at Killiecrankie (1689), Prestonpans (1745) and Falkirk Muir (1746) but broke down at Culloden (16 April 1746) against open terrain, disciplined regulars, effective artillery/grapeshot and an adapted bayonet drill — marking its documented obsolescence. [Established, with some mechanics Disputed]
- The popular "savage/undisciplined warriors" framing is a distortion: modern scholarship documents clan-based command, tactical discipline and coordination — while also confirming the tactic's genuine brutal effectiveness and psychological impact. [Shared/Traditional myth corrected]
Key Facts
- Period/dates covered: c. 1644 (Wars of the Three Kingdoms) to 1746 (Culloden); last uses in British service 1759 (Plains of Abraham) and 1776 (Moore's Creek Bridge)
- Key theme/institution: Highland/clan shock warfare; Jacobite armies 1689–1746; countered by the British/government army
- Notable feature: Single close-range volley followed by rapid broadsword-and-targe melee; wedge/cluster formations built around kin groups
- Current status/legacy: Obsolete as a tactic after 1746; enduring in Scottish military memory and popular culture; indirect influence on the martial reputation of later Highland regiments
Scottish Impact Index (SI Score)
- Military Impact
- 8/10
- Enduring Significance
- 8/10
- Strategic Importance
- 6/10
- Military Distinctiveness
- 10/10
- Military Legacy
- 9/10
- Recognition
- 9/10
50/60
Ranked =23rd of 43 in Defence
Claim Status
The existence, mechanics and effectiveness of the Highland Charge are established — documented in contemporary eyewitness accounts (Hugh Mackay, the Master of Sinclair, Donald McBane, the Chevalier de Johnstone), in institutional histories (National Army Museum, National Trust for Scotland), and in peer-reviewed scholarship (David Stevenson, J. Michael Hill). The origins are Shared/Traditional and partly Disputed: historians differ over whether the charge was a 17th-century innovation or the latest form of an ancient Gaelic tradition. Certain precise mechanics — notably the "new bayonet drill" at Culloden and exact casualty tallies — are disputed in detail, though the broad pattern is well supported. The "savage/undisciplined" framing is a myth corrected below.
Timeline
Early, spectacular use under Montrose and Alasdair Mac Colla; the Covenanter line broken.
Mac Colla's Irish/Highland foot at the core of Montrose's victories.
The charge shatters the Campbells; Mac Colla's reputation cemented.
The classic charge; Viscount Dundee's Jacobites rout Mackay's larger government army in minutes, though Dundee is killed. Government casualties far exceed Jacobite losses.
The charge succeeds on the Jacobite right but the battle is indecisive; strategic failure ends the Fifteen.
Sir John Cope's inexperienced army broken in under half an hour.
Last clear battlefield victory of the charge; General Hawley's larger force routed in storm conditions.
The charge fails for the first time; obsolescence.
78th Fraser Highlanders' broadsword charge — last known successful Highland Charge, now in British service.
Last known attempt; a disastrous failure.
Details
The tactical mechanics of the Highland Charge explained
The mature Highland Charge was a carefully sequenced tactic, not an undisciplined stampede. Contemporary and scholarly accounts agree on a consistent pattern. The clansmen preferred to form on high ground and on firm, dry footing, so that speed and downhill momentum could be maximised; they frequently shed their plaids and lower-body clothing to run faster. They advanced in clusters of roughly a dozen men — often blood relatives — which coalesced into larger wedge-shaped bodies typically four or more ranks deep, with the best-armed clan gentry ("the Fine") in the front rank and more lightly armed men behind.
As they came within effective musket range (accounts give figures from around 20–30 paces up to about 60 yards), those with firearms fired a single volley. This served two functions: it inflicted casualties on the densely packed enemy line, and its dense powder-smoke masked the Highlanders' final approach. Crucially, the clansmen did not attempt to reload — a well-drilled musketeer needed roughly 20–30 seconds to reload, an eternity once the charge was underway. Instead they dropped their firelocks, drew broadsword and dirk, took cover behind the targe (a small round shield), and rushed the last stretch with Gaelic war-cries, frequently accompanied by the pipes. Many accounts (including the Master of Sinclair's description of Sheriffmuir) describe the men throwing themselves flat when the enemy fired, then rising to complete the rush through the smoke.
At contact, the technique was specific. The Chevalier de Johnstone described how a Highlander would take the enemy's bayonet-thrust on his targe, bending the left knee to cover the body, then raise the sword-arm to strike. The basket-hilted broadsword protected the hand and could be used for both cutting and thrusting; the dirk, held in the targe hand, finished the work at grappling distance. The physical results were appalling: a contemporary account of Killiecrankie, quoted by ScottishHistory.org, records government dead "so hashed and mangled" that "many had their heads divided into two halves by one blow; others had their sculls cut off above the ears by a back-stroke, like a night-cap."
Why it worked against linear infantry
The charge was effective because it attacked the precise weaknesses of the linear "pike-and-shot" and early flintlock systems of the period. First, the reload interval: muzzle-loading muskets could manage only two or three shots a minute at best. A charge that crossed the killing ground fast enough could absorb one volley and reach the line before a second could be delivered. Second, the plug bayonet: before the ring and socket bayonets, the bayonet was rammed into the muzzle, meaning a musket with a fixed bayonet could not be fired, and one that had just fired could not instantly become a spear. This left a fatal transition gap that the charge was designed to exploit — vividly demonstrated at Killiecrankie, where, as Historic UK records, Mackay's troops, "surprised by the rapid change in tactics… did not have time to fix bayonets and so were ill equipped for the close quarter hand to hand fighting that would follow. The battle quickly turned into a rout." Third, psychology: the noise, speed and apparent fearlessness of the charge, and the concentration of a linear formation's frontage into a battering wedge, panicked inexperienced or shaken troops into premature firing and flight. As the National Trust for Scotland's Culloden interpretation stresses, the charge "was used with great effect against the Government armies and was a deadly combination of physical and psychological warfare, when used correctly."
Historians emphasise that the decisive effect was usually the rout, not the melee: the aim was to make part of the enemy line break, opening gaps that could be exploited to "roll up" the rest. Where troops held their ground and kept firing, the charge was far more costly to the attackers — a point that would matter greatly at Culloden.
Key engagements demonstrating effectiveness
At Killiecrankie (27 July 1689), Viscount Dundee ("Bonnie Dundee") held his charge until the setting sun was out of his men's eyes, then loosed it downhill against Major-General Hugh Mackay's government army in the pass. Mackay's men — including professional veterans of the Dutch Scots Brigade — got off only a shot or two before being overwhelmed; the government army was routed in minutes, though Dundee was killed at the moment of victory and the rising soon collapsed at Dunkeld. According to ScottishHistory.org, "Mackay left behind perhaps as many as 1,800 killed, wounded or taken prisoner. The Jacobites had lost between 700–800 men."
At Prestonpans (21 September 1745), the Jacobites used local knowledge to cross a marsh and fall on the flank of Sir John Cope's inexperienced army at dawn. When Cope's artillery opened fire it triggered an immediate charge; the gunners fled, the dragoons broke, and the infantry disintegrated. The fighting was famously brief — the History of Parliament records that "one anonymous eyewitness to the rout declared it was even worse than that and that the troops had given up within just four and a half minutes of making contact with the enemy."
At Falkirk Muir (17 January 1746), Lord George Murray seized the high ground in a winter storm, with wind and rain at the Jacobites' backs and in the government army's faces. The Highland right broke General Hawley's regiments and routed his dragoons; the Jacobites won the field. It was, as Falkirk Local History Society rightly records, "the last time the famous Highland charge swept the clansmen to victory." Even so, on the government left several regiments under Cholmondeley held and drove off the charge with disciplined platoon fire — a foretaste of Culloden.
The "savage / undisciplined warriors" mythbusting
The popular image — reinforced by centuries of romanticism and by modern screen depictions — is of a wild, instinctive rush by "savage" tribesmen. Modern scholarship rejects this on the evidence. Executing the charge required considerable discipline and coordination: holding formation under fire, absorbing a volley, throwing oneself flat and rising on cue, delivering a controlled single volley at close range, and then transitioning en masse to edged weapons and reforming into wedges. This was underpinned by the clan structure, in which men fought in kin-based groups under their own gentry and chiefs — a command system that produced ties, in the National Trust for Scotland's phrase, "often stronger than those of a basic regiment." Historians such as Stuart Reid, whose Highland Clansman 1689–1746 is a standard modern study, explicitly dismantle the "Victorian-fabricated" image of an undifferentiated mass of broadsword-wielding kilted men, showing instead a socially layered force with recognisable organisation, equipment and tactics.
At the same time, the corrective must not overshoot into the opposite error — the claim that the charge was "only a myth" or never really effective. It plainly was effective, repeatedly, against regular troops, and its physical and psychological brutality is documented beyond serious doubt. The accurate picture is of a specialised, disciplined shock tactic with real limitations, not of either noble savages or a romantic fiction.
Culloden and the documented breakdown
At Culloden (16 April 1746) the pattern failed for the first time, and every documented factor worked against the charge. The Jacobite army was exhausted and hungry after an abortive night march on Cumberland's camp at Nairn; it was outnumbered (roughly 5,000 against 9,000) and heavily outgunned. Against the urging of Lord George Murray, Charles Edward Stuart chose to stand on Drummossie Moor — flat, open and boggy ground with no cover, offering a clear field of fire to Cumberland's artillery and none of the broken terrain the charge needed. As the National Army Museum bluntly puts it, "the battlefield was ill-chosen, as it afforded a clear field of fire to Cumberland's artillery."
Cumberland's guns bombarded the stationary Jacobite line with round shot and then grapeshot/canister for around half an hour before the charge was finally, and belatedly, unleashed — in places spontaneously, without clear orders. Recent National Trust for Scotland archaeology (finds made in late 2023 and announced ahead of the battle's 278th anniversary) has recovered dense concentrations of musket balls and grapeshot within "a small 60 sq m area close to the Government frontline," physically confirming the intensity of the fire. NTS Head of Archaeology Derek Alexander noted one lead grapeshot ball "around 2–3cm in diameter and, at 102g… about four times a standard musket ball," found beside a broken copper-alloy shoe buckle possibly belonging to Donald Cameron of Lochiel, who "led the 400-strong Camerons regiment into the battle" and was wounded in both ankles at its head. The boggy ground and a subtle slope caused the charge to drift rightwards and bunch against the government left, where Barrell's 4th and Munro's 37th Foot received the main impact. Some clansmen broke into the front line in ferocious hand-to-hand fighting; but disciplined regulars who "maintained discipline when charged," supported by mortar fire and enfilading musketry from a deeply echeloned line, halted the breakthrough and drove the survivors back into a rout. The whole action lasted under an hour. Per the National Army Museum, "between 1,000 and 1,500 of Prince Charles Edward's men were killed," while "the casualties on Cumberland's side were significantly lower: 50 dead and 259 wounded."
Government countermeasures and evolving doctrine
The government army's answer to the charge evolved over nearly sixty years. The first technological fix followed directly from Killiecrankie: Hugh Mackay is credited with promoting the ring bayonet (and, soon after, the socket bayonet), which allowed a musket to be fired and reloaded with the bayonet fixed, closing the fatal plug-bayonet gap. (Ring/socket designs were being experimented with in France in the same period, so this was a convergence rather than a purely Scottish invention.)
The best-documented tactical countermeasure is the "new bayonet drill" associated with Cumberland's army before Culloden. According to a soldier's letter published in The Scots Magazine in 1746, instead of thrusting at the swordsman directly in front — whose targe would deflect the point — each infantryman was to thrust obliquely to his right into the exposed flank of the Highlander attacking his neighbour, trusting the man on his own left to protect him in turn. As Encyclopædia Britannica summarises it, "each British soldier, instead of attacking the Highlander directly in front of him, bayoneted the exposed side of the man to his right." This is genuinely disputed: The Scots Magazine itself printed a retraction in November 1746, and the attribution of a similar technique to the Duke of Argyll at Sheriffmuir (1715) is unconfirmed. However, several other primary documents attest to some alteration, and Cumberland certainly drilled his men intensively — including modified platoon-firing practice at Aberdeen in April 1746 — and hardened their morale after Falkirk. What is clear is that the combination of disciplined, steady troops, effective artillery, favourable open ground and improved bayonet handling — not any single "trick" — defeated the charge. As Private Isaac Midgely of Barrell's recalled (National Army Museum), "After the battle there was not a bayonet in this regiment that was neither bloody or bent."
More broadly, the charge belonged to an era of transition. As firearms improved (faster, more reliable flintlocks; the socket bayonet turning every musketeer into a pikeman) and disciplined volley fire matured, the window the charge relied upon narrowed until it closed. Interestingly, elements of the shock ethos survived in British service: the "volley and bayonet charge" used by Highland regiments across the empire echoed the old sequence of a close volley followed by a rapid close assault.
Legacy and connection to later Highland regimental tradition
Within a decade of Culloden, and especially after war with France resumed in 1756, the government began recruiting Highlanders into the British Army in large numbers — William Pitt the Elder championing the policy of turning a feared enemy into a "storehouse" of aggressive, loyal troops. The martial reputation forged at Prestonpans and Falkirk unquestionably fed the mystique of the new Highland regiments, and the last two Highland Charges in history were in fact delivered for the Crown: the 78th Fraser Highlanders' broadsword charge at the Plains of Abraham in 1759 (the last successful one) and the Loyalist attempt at Moore's Creek Bridge in 1776 (a catastrophe, the patriots having stripped planking from the bridge and greased the rails).
This connection, however, must be stated carefully. Recent scholarship (for example, "Continuity, Coercion and Myth: The Recruitment of Highland Regiments in the Later Eighteenth Century," and work on the construction of Scottish military identity) stresses that the later "warrior race" image was substantially a constructed myth, promoted by landed elites and the state for political and economic reasons, and that recruitment relied heavily on economic coercion and impressment as well as genuine martial tradition. The clan system was already in decline well before Culloden. So while the Highland Charge is a real thread in the ancestry of the kilted regiments' reputation, it is not a simple, unbroken causal line from clan warrior to redcoat — and this card treats the link as real but qualified. (See Cards #3–4 Black Watch and #10–13 for the regiments themselves.)
Did You Know?
- The tactic was originally known as the "Irish charge," reflecting the Irish Confederate troops who came to Scotland with Alasdair Mac Colla in 1644.
- The word claymore comes from the Scottish Gaelic claidheamh mòr, "great sword" — though by the Jacobite era the weapon of the charge was usually the one-handed basket-hilted broadsword, not the older two-handed blade.
- At Killiecrankie, a government soldier named Donald McBane — later a celebrated swordsman — reputedly escaped the pursuing Highlanders by leaping about 18 feet (5.5m) across the River Garry at a spot still called the Soldier's Leap.
- The Highlanders often used their own musket smoke as a screen, firing a single volley and then vanishing into the cloud before emerging with drawn swords — a deliberate tactic, not an accident.
- Bagpipes were associated with the charge and with martial culture to the extent that they later featured in the suppression of Highland military tradition; the National Trust for Scotland notes this is "perhaps one of the reasons the bagpipes would later become classed as 'weapons of war'."
- General Hugh Mackay, humiliated at Killiecrankie, is credited with helping to develop the ring bayonet — the loser of the battle helping to design the technology that would eventually neutralise the tactic that beat him.
- The battle of Prestonpans was reportedly decided in as little as four and a half minutes of contact, according to one anonymous eyewitness.
- The last successful Highland Charge in history was made not against the British but for them — by the 78th Fraser Highlanders outside Quebec in 1759, the regiment that also took the heaviest casualties of any British unit in that battle.
FAQ
1What exactly was the Highland Charge?
It was a battlefield shock tactic used by Scottish Highland and clan forces from the 1640s to the 1740s. Attackers advanced rapidly (ideally downhill), fired a single close-range musket volley, dropped their firearms, and closed at a run with broadsword, targe and dirk for a hand-to-hand assault designed to break the enemy line by shock. It combined firepower with edged-weapon melee in one continuous sequence.
2When and where was it used?
Across roughly a century, chiefly in Scotland during the Wars of the Three Kingdoms (Tippermuir, Aberdeen and Inverlochy in 1644–45) and the Jacobite risings (Killiecrankie 1689, Sheriffmuir 1715, Prestonpans 1745, Falkirk Muir 1746, and Culloden 1746). It was later used in British service at the Plains of Abraham (1759) and Moore's Creek Bridge (1776).
3Why was it so effective against regular troops?
It exploited three weaknesses of period infantry: the slow (20–30 second) musket reload, the plug bayonet that blocked the muzzle when fixed, and the psychological shock of a fast, screaming close assault. If part of the enemy line broke, the charge could roll up the rest. Its success depended heavily on speed, terrain and the enemy's steadiness.
4Who invented it?
This is debated. David Stevenson credits the 17th-century warrior Alasdair Mac Colla with developing the mature firearms-plus-broadsword charge in the 1640s (Stevenson dates an early use to 1642 in Ireland and its arrival in Scotland to 1644). J. Michael Hill emphasises continuity with much older Gaelic and Celtic shock tactics reaching back through the gallowglass and beyond — his 1994 journal study is titled "The Origins and Development of the 'Highland Charge' c. 1560 to 1645." The two views are complementary: an ancient charging tradition given new form once muskets and basket-hilted broadswords were combined.
5Were the Highlanders just undisciplined "savages"?
No. Executing the charge required real discipline — holding formation under fire, delivering a controlled single volley, and transitioning en masse to melee — all organised through kin-based clan units under their gentry and chiefs. The "savage" image is a later romantic and political construction. That said, the tactic's genuine ferocity and psychological terror are also well documented; the accurate view rejects both romanticism and dismissal.
6What weapons did they use?
The signature kit was the basket-hilted broadsword (protecting the sword hand), the targe (a small round shield, sometimes with a central spike), and the dirk (a long dagger, often held in the shield hand). Many men also carried muskets and/or pistols for the opening volley. Poorer clansmen ("humblies") often carried cheaper weapons such as Lochaber axes.
7Why did the charge fail at Culloden?
Multiple documented factors combined: exhausted, hungry and outnumbered Jacobites; flat, boggy, open ground unsuited to the charge; devastating government artillery and grapeshot; steady, well-drilled regulars who held their ground; and an adapted, better-handled bayonet defence. Boggy terrain also skewed the charge rightward, bunching it against part of the government line.
8Did Cumberland really invent a "new bayonet drill"?
Partly. A 1746 soldier's account described thrusting at the exposed right side of the Highlander attacking one's neighbour, bypassing his targe. This is disputed — The Scots Magazine later retracted the claim — but several other primary sources support some alteration, and Cumberland certainly drilled his infantry hard. Historians treat the "new drill" as real in substance but exaggerated in popular retellings; discipline, ground and artillery mattered as much or more.
9How did armies counter the charge over time?
Technologically, the ring and then socket bayonet (from the 1690s) let a musket be fired with the bayonet fixed, removing the plug-bayonet gap. Tactically, disciplined platoon and rank fire, steady nerves, favourable open ground, artillery firing grapeshot, and reserve lines all blunted the charge. By the mid-18th century these developments had made it obsolete against a prepared regular army.
10Was Culloden England versus Scotland?
No. It was part of a civil war and dynastic struggle. Loyal clans, government regiments raised in Scotland, and three Scottish regiments of the British Army fought against the Jacobites; there were ultimately more Scots under arms against Prince Charles Edward than for him. Framing it as a simple national contest is historically inaccurate.
11When was the Highland Charge last used?
The last known successful charge was by the 78th Fraser Highlanders at the Plains of Abraham near Quebec in 1759. The last known attempt was by Loyalist Highlanders at Moore's Creek Bridge in North Carolina in 1776, where the patriots had stripped planking from the bridge and greased the rails; it failed badly.
12How is the charge remembered today?
It endures as one of the most powerful images of Scottish military history, commemorated at preserved battlefields such as Culloden (National Trust for Scotland) and popularised — and often romanticised — by literature, tourism and screen dramas such as Outlander. Serious institutions increasingly present it as a genuine tactic deserving analysis, while cautioning against both romantic and dismissive extremes.
Sources
Primary / Institutional
- National Army Museum, "Battle of Culloden" (nam.ac.uk) — battle narrative, armies, casualties, myths and legacy; Private Isaac Midgely quotation.
- National Trust for Scotland, "The psychology of the Highland Charge" and "The Battle of Culloden" (nts.org.uk) — Culloden interpretation.
- National Trust for Scotland, "New finds at Culloden shed light on intensity of battle" (nts.org.uk) — grapeshot and buckle finds, late 2023 (announced 2024).
- The Scots Magazine (1746) — contemporary account of the "new bayonet drill" and its November 1746 retraction.
- Major-General Hugh Mackay, Memoirs of the War Carried on in Scotland and Ireland, 1689–1691.
- Chevalier de Johnstone, A Memoir of the 'Forty-Five — eyewitness description of charge mechanics.
Scholarly
- David Stevenson, Alasdair MacColla and the Highland Problem in the Seventeenth Century (John Donald, 1980); reissued as Highland Warrior (2003).
- David Stevenson, "The First Highland Charge," History Today 32:8 (August 1982).
- J. Michael Hill, Celtic Warfare, 1595–1763 (John Donald, 1986).
- J. Michael Hill, "The Distinctiveness of Gaelic Warfare, 1400–1750," European History Quarterly 22 (1992).
- J. Michael Hill, "The Origins and Development of the 'Highland Charge' c. 1560 to 1645," Militärgeschichtliche Mitteilungen 53:2 (1994), DOI 10.1524/mgzs.1994.53.2.295.
- J. Michael Hill, "Gaelic Warfare 1453–1815," in Jeremy Black (ed.), European Warfare 1453–1815 (Palgrave, 1999).
- Stuart Reid, Highland Clansman 1689–1746 (Osprey Warrior 21, 1997).
- "Continuity, Coercion and Myth: The Recruitment of Highland Regiments in the Later Eighteenth Century," Scottish Tradition 26 (2001).
General further reading
- National Trust for Scotland, Culloden Visitor Centre resources.
- Historic Environment Scotland, Inventory of Historic Battlefields (Killiecrankie, Sheriffmuir, Falkirk II, Culloden).
- Historic UK and Battlefields of Britain battle summaries (Killiecrankie, Falkirk Muir, Prestonpans).
Honest Caveats
- "Savage / undisciplined warriors" (myth corrected): The charge required organisation, timing and discipline, delivered through clan command structures; the "wild savage" image is a later romantic and political construction. Equally, the tactic's real ferocity and effectiveness should not be dismissed — both extremes are wrong.
- Origins (disputed): Whether Alasdair Mac Colla "invented" the charge (Stevenson) or merely gave modern form to an ancient Gaelic tradition (Hill) remains an open scholarly question; the two positions are best read as complementary.
- Cumberland's "new bayonet drill" (disputed): Attested by a 1746 letter but retracted by the same magazine; supported by other sources but probably exaggerated in popular accounts. The victory at Culloden owed as much to ground, artillery and discipline as to any single technique.
- Casualty figures (variable): Killiecrankie government losses are given as roughly 1,800–2,000, Jacobite losses ~700–800; Culloden Jacobite dead are usually put at 1,000–1,500 against ~50 government dead and 259 wounded. Figures vary by source.
- Regimental legacy (qualified): The link between the charge's reputation and later Highland regiments is real but must not be overstated; recruitment relied heavily on economic coercion, and the "warrior race" image was partly manufactured.
- The ring bayonet (contested attribution): Often credited to Hugh Mackay after Killiecrankie, but similar designs were being trialled in France in the same period; it was a convergence, not a sole invention.
Card 028 · Defence